Show Me - Collisions 2D
The Collisions 2D applet simulates elastic and inelastic two-dimensional collisions
in both the lab and centre of mass frames.
Preamble
This applet illustrates conservation of momentum and elasticity in two dimensional
collisions. As well, it shows how collisions may be viewed from a lab frame
and centre of mass frame.
This page is designed to get you started using the applet. The applet should
be open. The step-by-step instructions on this page are to be done in the applet.
You may need to toggle back and forth between instructions and applet if your
screen space is limited.
Contents
Setting Collision Conditions
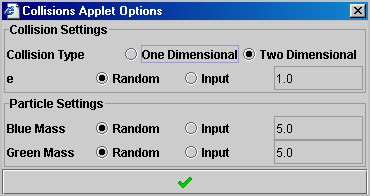 Pressing
the options button (
  ) opens the Collisions Applet Options box. This box allows you to choose
the collision type (1D or 2D) and control the elasticity of the collision (e)
and the masses of each object.
By default, the collision type will be set as two dimensional. The elasticity
and masses are set to random - if you run a new collision, the applet will randomly
generate new values. To enter a specific value, select input ( ).
The entry box will become active (turn white) and you can enter a value. Press
the
  button to close the box. If you have entered specific values, the applet will
keep these values for subsequent collisions.

Looking at Collision Data
Pressing the data button (  ) opens the Collisions Applet Data box. This box lists all important
information about the collision - the initial and final velocities, masses,
radii, scatter angles, coefficient of restitution, angular momentum.... As well,
the data in this box immediately updates when you change collision conditions
- you can this use this as a collision calculator. Practice using this feature
of the applet:
- Press the data button. Move the data box to the side so that the applet
controls are not covered up.
- Adjust the velocity. Look at the data box and see how the values for velocity
immediately update.
- Adjust the impact parameter slider and notice that the final velocities
and the scatter angle change
- Press the options button (
 ):
):
- vary the masses of the balls and see how the data immediately updates
- set e = 0 and notice that three more pieces of data are now listed:
angular momentum for each ball and angular velocity and
moment of inertia for the CM

Setting the Impact Parameter
 The impact parameter
controls the degree to which the objects are in line with each other. The value
of the impact parameter is calculated by:

where b is the distance between the centre of the objects, r1 is
the radius of the blue object , r2 is the radius of the green object
and. The angle F is the angle for the change in momentum.
The diagram to the right shows angle F. Notice that
adjusting the slider displaces the blue object from the centre line. Practice
using this feature:
- Vary the impact parameter between 1.0 and -1.0
- If the impact parameter is a positive number, the blue object is above
the centre line
- If the impact parameter is a negative number, the blue object is below
the centre line
- If the impact parameter is 0, the blue mass is on the centre line and
the collision with be head on (and 1-dimensional)
- If the impact parameter is ±1, the objects "miss" each
other and there is no collision
By adjusting the impact parameter, you are adjusting the scatter angles. To
set scatter angles to specific values, look at the data listed in the data box
(press the data button to open this). Adjust the impact parameter until the
scatter angle you desire is achieved.

2D Collisions in the Lab Frame
The lab frame shows 2D collisions from a laboratory frame of reference. Let's
run an example collision and examine this feature of the applet.
Example: Perfectly Elastic Collision Analysed in the Lab Frame
A 3.0 kg ball is moving to the right with a speed of 5.0 m/s. It runs into
a 10.0 kg ball that is at rest. After the collision, the 3.0 kg mass is now
moving with a speed of 3.25 m/s, at an angle of 113° to its original direction.
What is the speed and direction of the 10.0 kg mass after the collision?
First, let's use the applet to analyse the collision:
- Press the options button (
 ) and set the applet conditions to match the questions. Set e to 1.0.
(To numerically enter values, check the Input option,
  and enter the specific values in the space provided).
- Set the initial velocity of the blue ball to 5.0 m/s.
- To vary the scatter angle for the blue mass, you must adjust the impact
parameter:
- press the data button, (
 ) and look at the scatter angle for the blue mass
- adjust the impact parameter until the scatter angle is as close as possible
to 113° (you should discover that when the scatter angle is 113°,
the final velocity of the blue mass is 3.25 m/s)
- when you have the angle set right, the impact parameter is 0.43
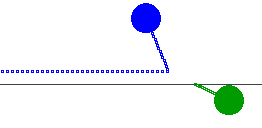
- Play the applet. You should notice the following:
- Before: the blue ball moves to the right and the green ball is
at rest

- After: the blue ball bounces off, moving up and toward the left.
The green ball begins to move down and to the right. The blue ball travels
faster than the green ball.
- Press the data button, (
 ) to view the collision information. The final velocities and scatter
angles have been highlighted in the image below:

You should see that the green mass moves with a speed of 2.08
m/s and at an angle of -25.47°. Since this angle is negative, it means that
the ball's direction is below the centre line. Now, let's verify the applet
and make sure we can calculate the same information:
- First, list the known and unknown variables. Since this is a 2D collision,
we also list the horizontal (x) and vertical (y) components of the velocities:
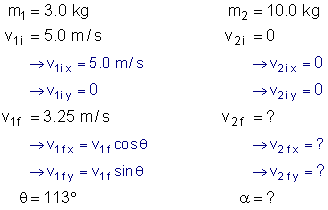
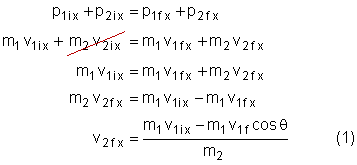
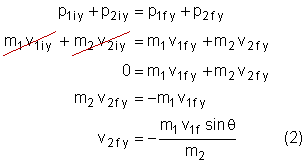
- Momentum be conserved in both the x and y directions. So, we set up two
sets of equations - one to solve for the green ball's final velocity in the
x-direction and the other to solve for final velocity in the y-direction:
Conservation of momentum in the x-direction:
 |
Conservation of momentum in the y-direction:
 |
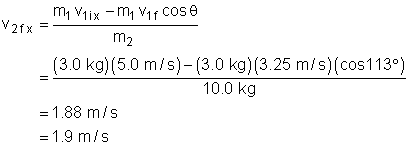
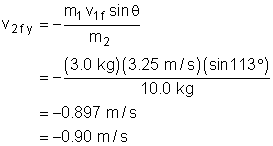
- Now we substitute in the known values into equations 1 and 2:
Green ball's final velocity in the x-direction:
 |
Green ball's final velocity in the y-direction:
 |
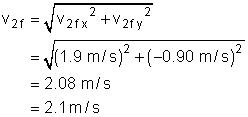
- Now that we know the final velocity in the x and y directions, we can determine
the total final velocity of the green mass and its direction:
Green ball's final velocity:
 |
Direction of motion:
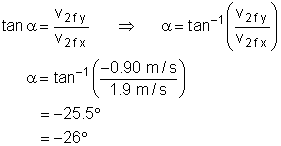 |
We discover that after the collision, the green ball travels with a speed
of 2.1 m/s, at an angle 26° to the horizontal. Our calculations match
the applet.

Advanced Features
Angular Momentum
Angular momentum must also be conserved in a collision. We are most concerned
with angular momentum when the collision is completely inelastic. In this case,
the objects stick together. If the collision is not head-on, the system
begins to rotate to conserve angular momentum. Investigate this feature of the
applet now:
- Set the impact parameter so that the collision is 2D (any value other than
0 or ±1)
- Press the options button (
 ) and set the value of e to 0
- Play the applet - you should see that when the objects collide, they begin
to rotate as a system

- Press the data button (
 ). You should see that the applet now calculates the angular momentum for each
object, the angular velocity and the moment of inertia.

Printing
the Screen:
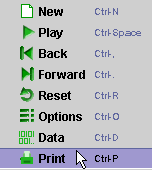
If you have access to a printer you can print the display panel by right
mouse clicking once in the display panel. A menu will appear just like the
one shown on the right. Select the print option. |
 |

 Pressing
the options button (
  Pressing
the options button (
 ![]() ) opens the Collisions Applet Options box. This box allows you to choose
the collision type (1D or 2D) and control the elasticity of the collision (e)
and the masses of each object.
) opens the Collisions Applet Options box. This box allows you to choose
the collision type (1D or 2D) and control the elasticity of the collision (e)
and the masses of each object. ![]() ).
).![]() button to close the box. If you have entered specific values, the applet will
keep these values for subsequent collisions.
button to close the box. If you have entered specific values, the applet will
keep these values for subsequent collisions.![]() )
)  The impact parameter
controls the degree to which the objects are in line with each other. The value
of the impact parameter is calculated by:
The impact parameter
controls the degree to which the objects are in line with each other. The value
of the impact parameter is calculated by:![]()


